Category Archives: Cloud
Feature Management – Azure App Configuration Service
Recently I was working on a project where we need to release new features to target specific set of users based on custom settings. While we started looking for alternatives, we found that Azure came up with a fully managed service to provide
A universal storage for all your Azure apps. Manage configurations effectively and reliably, in real time, without affecting customers by avoiding time-consuming redeployments. Azure App Configuration Preview is built for speed, scalability and security.
In this article I will explain WHY, WHAT and HOWs of using “Azure App Configuration” as a service.
Scenarios
If you are working on enterprise applications where your team regularly Pilot/flag new features dynamically without the need to deploy your code. Primarily isolating your configuration deployment from code deployments. Few examples could be
- Use Case 1: Enable a feature only during black Friday sale [start time and End time are fixed]
- Use Case 2: Enable a feature only for N% of incoming requests
- Use Case 3: Enable a feature only for configurable user attributes like their “email/country” etc.
- Use Case 4: Enable a feature only if ”somefeaturekey” value is “true”
Why Azure App Configuration Service?
- It is a fully managed azure service.
- It’s in preview as of today and currently Free. GA should be out by mid-October’19.
- Unified Feature Management configuration as a service.
- Unified app settings configuration as a service.
- Azure Portal has Ux with RBAC support by default.
- Disaster recovery is enabled.
- Maintains History of key value changes.
- Managed Service Identity MSI support is enabled.
- Supports event grid triggers/webhooks when any setting is changed. Amazing right?
- Supports Secret Manager tool to work efficiently in development mode.
- Works with clients like Asp.Net Core, .Net framework, Function Apps and JavaSpring as of today.
Get Started with App Configuration: Feature Manager
- Got to Azure portal search for -> App Configuration
- Create new App configuration store. Follow simple steps and wait for spinning it up.
- You should see the below blade of options. If you are familiar with Azure offerings each section is self-explanatory

4. Note down its connection string prefer to read only connection strings from “Access Keys” section. You will need it to connect it from any service.
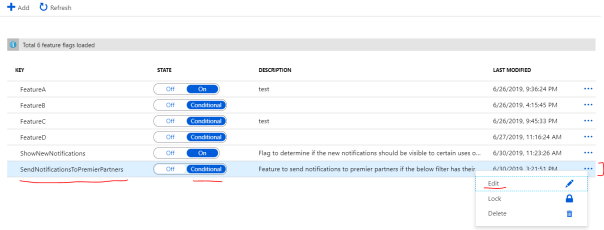
5. Go to “Feature Manager” section. Looks like below.

6. Click on Add.
7. Add new FeatureKey “ShowNewNotifications” and set it to true.
8. Ignore the “Add Filter” for now. It’s used to add more custom conditions. We will come back to it later.
9. Click on Apply. You should see

Feature Key is all set for your client to start consuming it.
Asp.Net Core Client – Simple Feature Toggle
While it works with clients like Function Apps and JavaSpring, I am demonstrating using Asp.Net Web Application (WebApi) project which targets .net framework 4.6.2. I am using Asp.Net Core 2.2 as a nuget package for web capabilities.
- Setup required nuget packages
- Extensions.Configuration.AzureAppConfiguration 1.0.0-preview-008920001-990
- Extensions.Configuration 2.2.0
- FeatureManagement.AspNetCore 1.0.0-preview-009000001-1251
- FeatureManagement 1.0.0-preview-009000001-1251
- Initialize App Configuration Service by Injecting the service on startup like below.
public class Startup {
public IConfiguration Configuration { get; }
public Startup(IHostingEnvironment env)
{
var builder = new ConfigurationBuilder()
.SetBasePath(env.ContentRootPath)
.AddJsonFile(“appsettings.json”, optional: true, reloadOnChange: true)
.AddJsonFile($”appsettings.{env.EnvironmentName}.json”, optional: true);
Configuration = builder.Build();
builder.AddAzureAppConfiguration(options => options.Connect(“AppConfigurationConnectionString_YouCopiedFromPortal”) .UseFeatureFlags()
);
}
public void ConfigureServices(IServiceCollection services) {
services.AddFeatureManagement() .AddFeatureFilter<PercentageFilter>() // inbuilt filter to enable a feature for only N% of incoming requests
.AddFeatureFilter<TimeWindowFilter>() // inbuilt filter to enable a feature for only during a time window.
.AddFeatureFilter<PremierEmailRuleFeatureFilter>(); //custom filter to enable a feature only when your specific logic returns true. Example is discussed in this article next.
}
}
That’s all the wiring you need to start reading your feature flag settings from App Configuration service.
3. Create Api Controller which will read the feature flag “ShowNewNotifications” we have setup to true.
using Microsoft.AspNetCore.Http;
using Microsoft.AspNetCore.Mvc;
using Microsoft.Extensions.Configuration;
using Microsoft.Extensions.Logging;
using Microsoft.Extensions.Primitives;
using Microsoft.FeatureManagement;
using System;
using System.Diagnostics.CodeAnalysis;
using System.Linq;
namespace TestCoreWebApp.Controllers {
[Route(“api/[controller]”)]
public class ValuesController : Controller {
private readonly IFeatureManager _featureManager;
private readonly IConfiguration _config;
public ValuesController(IFeatureManager featureManager, IConfiguration config) {
_featureManager = featureManager;
_config = config;
}
public string Get()
{
var isEnabled = _featureManager.IsEnabled(FeatureFlagConstants.ShowNewNotifications);
var output = $” Feature key ShowNewNotifications is set to {isEnabled}”;
return output;
}
}
}
4. Run the project in debug mode. Hit F5
5. You will see that _featureManager.IsENabled method will return true which is reading value from App Configuration portal. It returns true.
That’s how easy it is. By injecting IFeatureManager to your service code and you can enable features dynamically.
Add Conditional Feature Filter
While its really simple to access On/Off feature keys using _featureManager.IsEnabled(“keyname”) more often we will need custom logic to execute before a feature should be enabled.
We will write a custom filter to be ON conditionally only when certain EmailId is listed in a filter list. This feature flag decided if we need to send the notifications to this email or not.
- Go to azure portal -> App Configuration -> Feature Manager section
- Click on Add new feature.
- You should see the screen as below if you click the radio button “On/Conditional”. It means that If the condition is true Enable else disable always.

- Click on Add Filter. Type filter name “PremierEmailRule”.
- Click on the ellipses new to filter name to add parameters to this filter.
- Add Parameter name “AllowedEmailList”.
- Add Value to this parameter like test1@contoso.com,test2@contoso.com
- Please note that value is just a string with comma separated email ids.
- Click Apply to Parameters.
- Click Apply to Feature blade as well.
- You will see this new custom filter listed like this
- You can verify by clicking Edit if you want.
Your custom feature is all set up. Let’s go to api controller to consume this.
Write your own Custom Feature Filter
- Create a class which inherits from IFeatureFilter.
- Please read comments on the code below.
-
Using Microsoft.FeatureManagement;
// this name must match the Filtername in portal.
[FilterAlias(“PremierEmailRule”)]
public class PremierEmailRuleFeatureFilter : IFeatureFilter {
//Used to access HttpContext attributes like user,claims,request params etc.
private readonly IHttpContextAccessor _httpContextAccessor;
public PremierEmailRuleFeatureFilter(IHttpContextAccessor httpContextAccessor) {
_httpContextAccessor = httpContextAccessor;
}
/// <summary>
/// Executes when _featureManager.IsEnabled(featurename) is
/// called and azure app configuration has a valid filter present
/// </summary>
public bool Evaluate(FeatureFilterEvaluationContext context) {
StringValues queryVal;
// context will have all Parameters we have setup in portal. Names and their values.
// we will also create the class “PremierEmailRuleFilterSettings”. Check below.
var featureFilterParams = context.Parameters.Get<PremierEmailRuleFilterSettings>();
// Retrieve the current user email to find out if he is listed for notification or not. _httpContextAccessor.HttpContext.Request.Query.TryGetValue(“emailIdFromQueryString”, out queryVal);
// Only enable the feature if the user has ALL the required claims
var isEnabled = featureFilterParams.AllowedEmailList.Split(‘,’).Contains(queryVal.FirstOrDefault(), StringComparer.OrdinalIgnoreCase);
return isEnabled;
}
}
// it’s a simple poco class name it anything you like.
public class PremierEmailRuleFilterSettings
{
//this name must match the parameter name you have set in portal. refer to screen shots above.
public string AllowedEmailList { get; set; }
}
- Register all such custom filters in startup Configure method like this
-
services.AddFeatureManagement()
.AddFeatureFilter<PremierEmailRuleFeatureFilter>()
.AddFeatureFilter<PercentageFilter>();
- As you can see _featureManager.IsEnabled(“keyname”) will now invoke Evaluate method from IFeatureFilter. If you are debugging below controller code it will hit Evaluate method.
-
[Route(“api/[controller]”)]
public class ValuesController : Controller {
private readonly IFeatureManager _featureManager;
private readonly IConfiguration _config;
public ValuesController(IFeatureManager featureManager, IConfiguration config) {
_featureManager = featureManager;
_config = config;
}
public string Get()
{
// pass the key name you have setup in portal
var isEnabled = _featureManager.IsEnabled(“SendNotificationsToPremierPartners”);
var output = $” Feature key SendNotificationsToPremierPartners is set to {isEnabled}”;
return output;
}
}
- Above code will hit the Evaluate method implemented by custom feature filter class PremierEmailRuleFeatureFilter explained above.
That’s all there is to implement feature flagging/flighting in Azure ecosystem.
Configuration Explorer
If you are wondering that can we also use to replace the app settings json file completely. Answer is YES you can.

Using Configuration explorer, you can maintain all your key value pair settings in a single location which can be consumed by WebApis, services on VMs, Function Apps etc. Read further here for more information.
References
You may not find may articles on this as of today (June’19) but MS documentation is good enough for you start and implement it right away.
- What is Azure App Configuration
- Key Value store and explanaitions on Keys and Label filters
- More details on Managed Identity with App Configuration
- If you’re running ASP.NET Core, you need to look into dynamic reloading of data
- Azure Friday: Getting Started with Azure App Configuration
- When will GA be available?
Azure Blob Storage – Part 1 (WHY should you use it)
Azure has come a long way to come up with reliable storage options offered as cloud services. In this series of articles we will go into details in the below order.
- Azure Blob Storage – Part 1 (WHY)
- Azure Blob Storage – Part 2 (WHAT and WHERE)
- Azure Blob Storage – Part 3 (HOW) — Coming shortly
- Access Control policies (HOW LONG) — Coming shortly
- Triggering Azure function to process Blobs — Coming shortly
Even though I am focusing mainly on Blob storage in particular, We will first analyze the need to choose Azure storage and then continue to cover Blob in depth.
Azure offers below storage options as service.
- Blob
- File
- Disc
- Queue
- Table
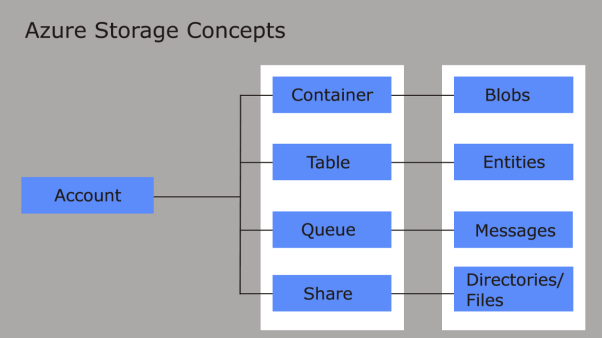
Conceptual Diagram
WHY: Let’s see why we must re-visit the conventional storage methods which were serving well earlier.
- Data growth is exponential in ever-growing social media platforms and streaming services.
- Scalability. You may not want it today but you want to be ready for future.
- Simplifying storage infrastructure management like backup and Site Recovery.
- Simplifying the user access management for stored resources. Audit compliance.
- Simplify to access large size data over web faster using redundancy and SSD.
Previous file shares were useful though it came with many vulnerabilities. Maintenance and user access audits were time consuming tasks. Once the user or a service account has access to file share, there was no way to control the duration of access.
Azure on the other hand takes care of most of the maintenance and other critical tasks for us to focus on the business problem not the operational aspect of infrastructure.
Here is a quick comparison snapshot of storage options as per MS documentation.

Even though the comparison chart above is self explanatory, in my personal experience I had observed the below use cases.
-
Upload/download large sized documents of different formats to server.
- If this is a new project and you have analyzed the cost aspects of storage, Blob is the easiest to implement which provides all benefits like Redundancy,security and time controlled access.
- Migrate existing File share to Azure storage with minimal or no code change. (Lift and Shift)
- In such cases Azure File Share fits better. You can even map a middle tier VM (on IAAS) directory and access it as a regular network file share with no code changes.
- Process large size files in a distributed system. Durability and decoupling is more important here.
- Choose Queues.
-
Store unstructured (noSQL) data which can be quickly accessed across regions.
-
Use Tables.
-
Azure provides extensive range of tooling to support different audiences like Powershell, CLI, Export/Import services.
Now that basic context has been set, we can double click on Blob storage.
First thing you would need is to have an Azure Subscription where we are going to generate and subscribes for these storage services. Refer to the below link to know the steps to create a storage account.
Blob Storage:
A blob can be considered to store any file (assume its binary) which can be in any format like .xls,.ppt etc. Blobs reside inside Containers. We will learn more about containers in Part 2.
Blob Storage Types
-
Block blobs : Are most commonly used files. Up to ~4.7 TB
-
Page blobs: Are used for random access large files like VHDs. This is how Azure manages files for itself.
-
Append blobs: Are made up of blocks like the block blobs, mainly used to append information to the existing block blob. Like logging information.
I hope it gives you a good start and we shall go in deeper in Part 2.
Azure Blob Storage – Part 2 (WHAT and WHERE)
